

Showing posts with label Knight. Show all posts
Showing posts with label Knight. Show all posts
Tuesday, April 1, 2014
Back to the Tacticals!
I've had this niggling urge to put a lot of good honest marines with bolters on the board for quite a while now. Having been playing Blood Angels since I got in 40k properly (about late 2009), I can put lotsa Assault Marines on the board, but for some reason I never got round to fielding any significant amount of Tacticals on the board, so here's what I'm up to:

Friday, March 28, 2014
Batrep: Blood Angels + Knight vs Khornate Chaos Marines, 1750 pts*
This is my 2nd outing with the Knight, and since it's been bloody ages since I've scribbled down a batrep, I figured it's high time I did. My opponent for this scrap was David, who was rather bravely fielding a very fluffy Chaos Marine list: (almost) pure Khorne! Anyway, a quick look at the lists.
My Blood Angels:
Librarian with plasma pistol and force axe (Powers: Prescience and Scrier's Gaze)
5 Assault Marines with Infernus pistol, meltabombs, and a meltagun in a Land Raider Redeemer with multimelta
5 Assault Marines with Infernus pistol, meltabombs, and a meltagun in a Razorback with lascannon and twin-linked plasmagun
5 Assault Marines with Infernus pistol, meltabombs, and a flamer in a Razorback with lascannon and twin-linked plasmagun
5 Scouts with sniper rifles, a missile launcher and camo cloaks
2 x Stormraven Gunships, each with hurricane bolters
Baal Predator with heavy bolter sponsons
Knight Errant
Warlord Trait: Strategic Genius
All ground vehicles were also upgraded with searchlights. Nothing complicated here, just a Knight Errant marching forth with mechanized Blood Angels in support. A pair of Stormravens covers the air support, and a Baal Predator is there to make a right nuisance of himself. Bitter experience has taught me that 1 Stormraven is never enough, and putting anything in there without an invulnerable save is a horribly risky move. At this points level, the Stormraven is a serious investment in points, and 1 cannot be relied on to do what needs doing.
*ADDENDUM: On closer inspection of my list the next morning, I realized that I didn't actually have points to field the Baal Predator. This is quite an embarrassing oversight on my part. Sorry, David. Still, given the performance of the Scouts (or lack thereof), this battle played out evenly enough to give some insight on the use of the Knight Errant, so I'm still leaving this batrep here.
David's Chaos Marines:
Kharne the Betrayer
Khorne Daemon Prince with wings, power armour and Axe of Blind Fury
8 Berserkers with a power axe for the champion, in a Rhino
8 Berserkers with a power axe for the champion, in a Rhino
8 Berserkers with a power axe for the champion, in a Rhino
Vindicator with siege shield and daemonic possession
Vindicator with siege shield and daemonic possession
3 Obliterators with Mark of Nurgle and Veterans of the Long War
Heldrake
Yeah, *almost* pure Khorne. But seriously, who in their right mind would field Obliterators and not give them the Mark of Nurgle? This is one of those lists that looks really characterful on paper but, in 6th edition 40k, is insanely difficult to play. Between the Berserkers and Kharne, that's nearly 700 pts of close combat lethality, but with only Rhinos to get them across the board and only 8 bodies in each squad, it is not going to be easy to put their skills to use.
Mission: The Relic
Deployment: Hammer and Anvil. I won the roll to go first and took first turn. Night fighting was active on the first turn.

Seeing as I was the one here with the bigger guns and troops in nice fast transports, I decided on a strategy of mauling the enemy at range, keeping the Knight close to the centre to threaten any attempt to grab the relic and, of course, brutalize anything worth shooting at with that lovely thermal cannon. In its first outing, the poor Knight was nuked when it lost 4 hull points to a single melta hit. As such, I was especially wary of the 2 Vindicators.
Ordinarily I would outflank my Baal Predator, but I could see this was a game where I wanted to inflict as much ballistic violence as possible, and so opted to have it start on the board, so I could fire as many guns as possible for as many turns as possible.
So, a simple mission with a simple plan. Read on to find out how it played out...
My Blood Angels:
Librarian with plasma pistol and force axe (Powers: Prescience and Scrier's Gaze)
5 Assault Marines with Infernus pistol, meltabombs, and a meltagun in a Land Raider Redeemer with multimelta
5 Assault Marines with Infernus pistol, meltabombs, and a meltagun in a Razorback with lascannon and twin-linked plasmagun
5 Assault Marines with Infernus pistol, meltabombs, and a flamer in a Razorback with lascannon and twin-linked plasmagun
5 Scouts with sniper rifles, a missile launcher and camo cloaks
2 x Stormraven Gunships, each with hurricane bolters
Baal Predator with heavy bolter sponsons
Knight Errant
Warlord Trait: Strategic Genius
All ground vehicles were also upgraded with searchlights. Nothing complicated here, just a Knight Errant marching forth with mechanized Blood Angels in support. A pair of Stormravens covers the air support, and a Baal Predator is there to make a right nuisance of himself. Bitter experience has taught me that 1 Stormraven is never enough, and putting anything in there without an invulnerable save is a horribly risky move. At this points level, the Stormraven is a serious investment in points, and 1 cannot be relied on to do what needs doing.
*ADDENDUM: On closer inspection of my list the next morning, I realized that I didn't actually have points to field the Baal Predator. This is quite an embarrassing oversight on my part. Sorry, David. Still, given the performance of the Scouts (or lack thereof), this battle played out evenly enough to give some insight on the use of the Knight Errant, so I'm still leaving this batrep here.
David's Chaos Marines:
Kharne the Betrayer
Khorne Daemon Prince with wings, power armour and Axe of Blind Fury
8 Berserkers with a power axe for the champion, in a Rhino
8 Berserkers with a power axe for the champion, in a Rhino
8 Berserkers with a power axe for the champion, in a Rhino
Vindicator with siege shield and daemonic possession
Vindicator with siege shield and daemonic possession
3 Obliterators with Mark of Nurgle and Veterans of the Long War
Heldrake
Yeah, *almost* pure Khorne. But seriously, who in their right mind would field Obliterators and not give them the Mark of Nurgle? This is one of those lists that looks really characterful on paper but, in 6th edition 40k, is insanely difficult to play. Between the Berserkers and Kharne, that's nearly 700 pts of close combat lethality, but with only Rhinos to get them across the board and only 8 bodies in each squad, it is not going to be easy to put their skills to use.
Mission: The Relic
Deployment: Hammer and Anvil. I won the roll to go first and took first turn. Night fighting was active on the first turn.
Seeing as I was the one here with the bigger guns and troops in nice fast transports, I decided on a strategy of mauling the enemy at range, keeping the Knight close to the centre to threaten any attempt to grab the relic and, of course, brutalize anything worth shooting at with that lovely thermal cannon. In its first outing, the poor Knight was nuked when it lost 4 hull points to a single melta hit. As such, I was especially wary of the 2 Vindicators.
Ordinarily I would outflank my Baal Predator, but I could see this was a game where I wanted to inflict as much ballistic violence as possible, and so opted to have it start on the board, so I could fire as many guns as possible for as many turns as possible.
So, a simple mission with a simple plan. Read on to find out how it played out...
Saturday, March 22, 2014
House Raven goes to war!
Aaaand here it is!


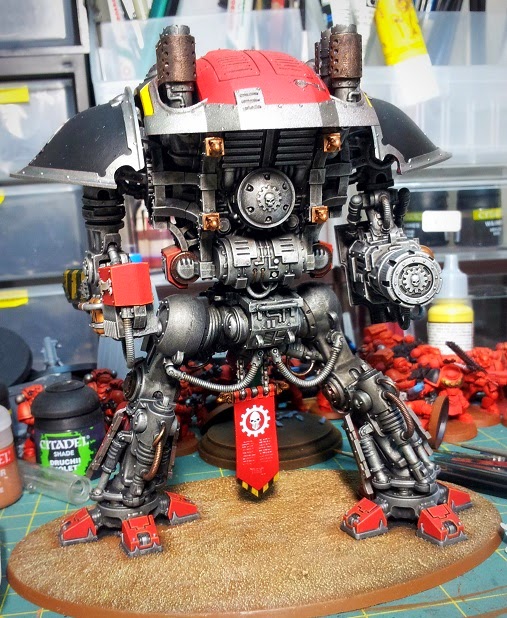
So, I took the big beastie to war today, pairing him with my Blood Angels. It wasn't an optimal list, but soddit, I just wanted to pop the knight on the board and see how it rolls. It was awesome. As someone who's fielded a Hellhammer in Escalation games at 1,750 pts, the Knight is a somewhat different experience. It is a very clear and palpable threat, but nowhere nearly as spectacularly destructive as the Hellhammer. And with only 6 hull points and max armour value of 13, it's really not that hard to kill. Anyway, I'm gonna be experimenting more with it. Here's what I have to say hobby-wise about some of the most recent touches.
The decals are awesome. Excellent quality and they go on like a dream. These bigger ones on the shoulder pads, however, will need some knifework to get them in place, and a touch of paint to finish.

The rocks on the base are actually bits of broken glass. Picked up a bag of the stuff from some petshop. They're for aquariums, apparently. I use them when I need particularly nice rocks. Here's how they're done...

First off, a coat of black...

Drybrush with Dawnstone or Codex Grey...

Final drybrush with Ulthuan Grey and that's that.

Truth be told, there's still a little work to do on tthe Knight, but hell, he's ready for battle. Game-wise, I think it's absolutely awesome. A beautiful centrepiece model that allies seamlessly with all my Imperial armies. Hobbywise, a joy to build and paint, and I'll be adding little bits to the base, touching up the highlights and perhaps get some weathering done over the coming weeks.
So, I took the big beastie to war today, pairing him with my Blood Angels. It wasn't an optimal list, but soddit, I just wanted to pop the knight on the board and see how it rolls. It was awesome. As someone who's fielded a Hellhammer in Escalation games at 1,750 pts, the Knight is a somewhat different experience. It is a very clear and palpable threat, but nowhere nearly as spectacularly destructive as the Hellhammer. And with only 6 hull points and max armour value of 13, it's really not that hard to kill. Anyway, I'm gonna be experimenting more with it. Here's what I have to say hobby-wise about some of the most recent touches.
The decals are awesome. Excellent quality and they go on like a dream. These bigger ones on the shoulder pads, however, will need some knifework to get them in place, and a touch of paint to finish.
The rocks on the base are actually bits of broken glass. Picked up a bag of the stuff from some petshop. They're for aquariums, apparently. I use them when I need particularly nice rocks. Here's how they're done...
First off, a coat of black...
Drybrush with Dawnstone or Codex Grey...
Final drybrush with Ulthuan Grey and that's that.
Truth be told, there's still a little work to do on tthe Knight, but hell, he's ready for battle. Game-wise, I think it's absolutely awesome. A beautiful centrepiece model that allies seamlessly with all my Imperial armies. Hobbywise, a joy to build and paint, and I'll be adding little bits to the base, touching up the highlights and perhaps get some weathering done over the coming weeks.
Monday, March 17, 2014
WIP: Imperial Knight, Part 3
Not much to mention, painting-wise. Just a LOT of tedious line-highlighting to get through, one armour plate at a time. I do, however, have something to say about the decal sheet.
The quality is really something else. This is by far the finest sheet of decalsI've ever laid eyes on. Follow the tips on GW's video and you really can't go too far wrong.

However, I have one gripe. The back of the manual shows you which crest to put where and guess what? The size is WRONG. Here it can be seen that the row marked '3' is, according to the manual, supposed to be placed on the banner between the legs. Well, as you can see, it doesn't bloody fit. Suffice it to say, I was most annoyed by this.

Regardless, I soldiered on and after applying a few more decals, I think the banner looks rather good. Still... that damn crest is vexing...

Undaunted, I also saw fit to adorn the back of the banner somewhat. Nothing fancy, just a couple of decals and a little text...
Here's a closer look. Some of you may recognize that the decal in the centre of the cog is in fact taken from the Space Marine Vehicle sheet.

And here's where we are now, 9 days later. Pleased, I am :-)

The quality is really something else. This is by far the finest sheet of decalsI've ever laid eyes on. Follow the tips on GW's video and you really can't go too far wrong.
However, I have one gripe. The back of the manual shows you which crest to put where and guess what? The size is WRONG. Here it can be seen that the row marked '3' is, according to the manual, supposed to be placed on the banner between the legs. Well, as you can see, it doesn't bloody fit. Suffice it to say, I was most annoyed by this.
Regardless, I soldiered on and after applying a few more decals, I think the banner looks rather good. Still... that damn crest is vexing...
Undaunted, I also saw fit to adorn the back of the banner somewhat. Nothing fancy, just a couple of decals and a little text...
Here's a closer look. Some of you may recognize that the decal in the centre of the cog is in fact taken from the Space Marine Vehicle sheet.
And here's where we are now, 9 days later. Pleased, I am :-)
Sunday, March 16, 2014
WIP: Imperial Knight, part 2
So, I devoted all of this weekend's hobby time to the Knight, who is certainly deserving of a name, as soon as I think of one. Here's my progress so far.

Don't let the armour plates fool you; they're held in place with Blu-tack. Only the one covering the top of the head has been deemed sufficiently complete to be glued into place. As for the others, there's a lot more to be done.
Here's a closer look at the carapace. I'm paying extra close attention to this, seeing as it's the most visible part. After I line highlight all the red with some Trollslayer Orange, I can start applying decals.

The little green window was done by painting successively smaller crescents of Dark Angel Green, Warboss Green and Scorpion Green in the lower right corner, followed by a dot of white in the upper right corner. Note that the transition between Dark Angel Green and Warboss Green is quite large, so that took a little blending.
The Cog Mechanicum's white bits were done in Ulthuan Grey, followed by a wash of Nuln Oil, then layering again with Ulthuan Grey. I line highlighted with a little Ceramite White on the edges. The black bits are just black with line highlights of Codex Grey. The brassy bits in between are simply Dwarf Bronze washed with Devlan Mud.
All the rivets were washed with Nuln Oil then highlighted with a dot of Ironbreaker. Tedious, but I kind of like the effect.
Doing the chainsword's stripes as black on yellow was definitely easier, as I didn't have to worry too much when applying the coats of Iyanden Darksun necessary to achieve a solid yellow. After that, it was a simple matter to pick out the stripes, then brighten the yellow with Golden Yellow.
The armour plates are all going to be blacklined with Nuln Oil, then line highlighted. A pretty arduous process, but I think it'll be worth it. Here's a closer look comparing two armour plates, before and after blacklining:


Anyhoo, after the detail work is done, decals! After that, final touch-ups and we're ready for WAR!

Thursday, March 13, 2014
WIP: Imperial Knight
2nd biggest model I've done yet, but by far the most detailed. Honestly, in terms of the actual modelling and painting joy there is in the Knight, the price (relative to a Baneblade) strikes me as really rather fair. Anyway, here's what I've done so far...
I did the chassis in pretty much the same way as prescribed by the GW video. First, I coated everything in Leadbelcher, then drowned the whole thing in Nuln Oil. I only washed once, though. Didn't see the need to wash twice. After that, a quick drybrush with Ironbreaker to give it a little more depth. The pistons were picked out as per the video, painted with Ironbreaker then washed on each end with Agrax Earthshade. I also picked out selected bits in Warplock Bronze, washed with Agrax Earthshade, then drybrushed with Dwarf Bronze.

The base was painted with a somewhat more thorough version of my usual technique. First, a few coats of Mournfang Brown, then drybrushed with Iyanden Darksun, then once more with Screaming Skull.

All the red bits were picked out in Mephiston Red and line highlighted with Trollslayer Orange.


A bit of careful work with Iyanden Darksun later, and here we are!

Stay tuned. More to come as it progresses...
I did the chassis in pretty much the same way as prescribed by the GW video. First, I coated everything in Leadbelcher, then drowned the whole thing in Nuln Oil. I only washed once, though. Didn't see the need to wash twice. After that, a quick drybrush with Ironbreaker to give it a little more depth. The pistons were picked out as per the video, painted with Ironbreaker then washed on each end with Agrax Earthshade. I also picked out selected bits in Warplock Bronze, washed with Agrax Earthshade, then drybrushed with Dwarf Bronze.
The base was painted with a somewhat more thorough version of my usual technique. First, a few coats of Mournfang Brown, then drybrushed with Iyanden Darksun, then once more with Screaming Skull.
All the red bits were picked out in Mephiston Red and line highlighted with Trollslayer Orange.
The chevrons are all done in Iyanden Darksun on a black background, then coated again with Golden Yellow. This can take several coats, so be patient, thin your paints and keep applying coat after coat after coat until a solid yellow is achieved.
I'll be experimenting with the reaper chainsword; I'm going to try black stripes on a yellow background. Pics later...
This bit is going to take a lot more work. I want the stripes to be bold and neat, which means a reasonable degree of symmetry. If you're going to do this with an old-fashioned brush like me, I recommend marking out your stripes, like so...
A bit of careful work with Iyanden Darksun later, and here we are!
Stay tuned. More to come as it progresses...
Subscribe to:
Posts (Atom)