Saturday, December 24, 2011

NECROOOONS!!!

Just a little update in between Apocalypse posts. Will get round to finishing the 2nd half, promise.

Anyway, I've gotten my grubby paws on a few more Warriors...


I think I'm definitely going to kitbash myself some plastic Crypteks. I got the resin one, and I can't say I'm impressed.

So, 24 Warriors, more or less done. About 36 more to go...

Sunday, December 18, 2011

APOCALYPSE!!!111!! Part 1 of 2

Played my first game of Apocalypse on Sunday. I've never seen all my painted Angels in one place before, let alone in battle, so I figured I'd give it a whirl.

I've no idea how many points we put on the board in total, but if I had to guess, I'd say:

Wong's Blood Angels: ~8,000pts

Not pictured: The horde of power armoured marines on the other table.

Yee How's Imperial Guard: ~5,000pts (nice pic unavailable)

Syaz's Ultramarines: ~6,000pts

Not pictured: A shit-tonne more Smurfs on the other table and in carry cases.

My Blood Angels: ~4,800pts

Yeah, that's all ~4,800pts in that picture. Ones to watch:
- the Stormraven with a Reclusiarch, 5 Death Company marines and a DC Dreadnought; and
- the Land Raider Redeemer with Librarian, Sanguinary Priest and 5 Assault Terminators.

Now, I'm pretty sure there was some kind of backstory to this game, but hell, at that table were gathered the kind of player who gives not a toss about fluff and is just out to bring forth their armies and kick ass.

Attackers: Blood Angels
Attackers' Objectives:
- Primary - Blow up the big statue on the hill. AV14, 2 structure points, 2 void shields.
- Secondary - Kill all the Ultramarine HQ choices: Marneus Calgar in power armour, 2 Chaplains, Chaplain Cassius, and 1 Librarian.
Strategic Assets: Flank March, Careful Planning.

Defenders: The Imperium (Ultramarines + Imperial Guard).
Defenders' Objectives:
- Primary - Don't let the defenders achieve their primary objective.
- Secondary - At least 1 Baal Predator or Furioso Dreadnought must survive to the end of the battle.
Strategic Assets: Disruptor Beacon, Shield Generator
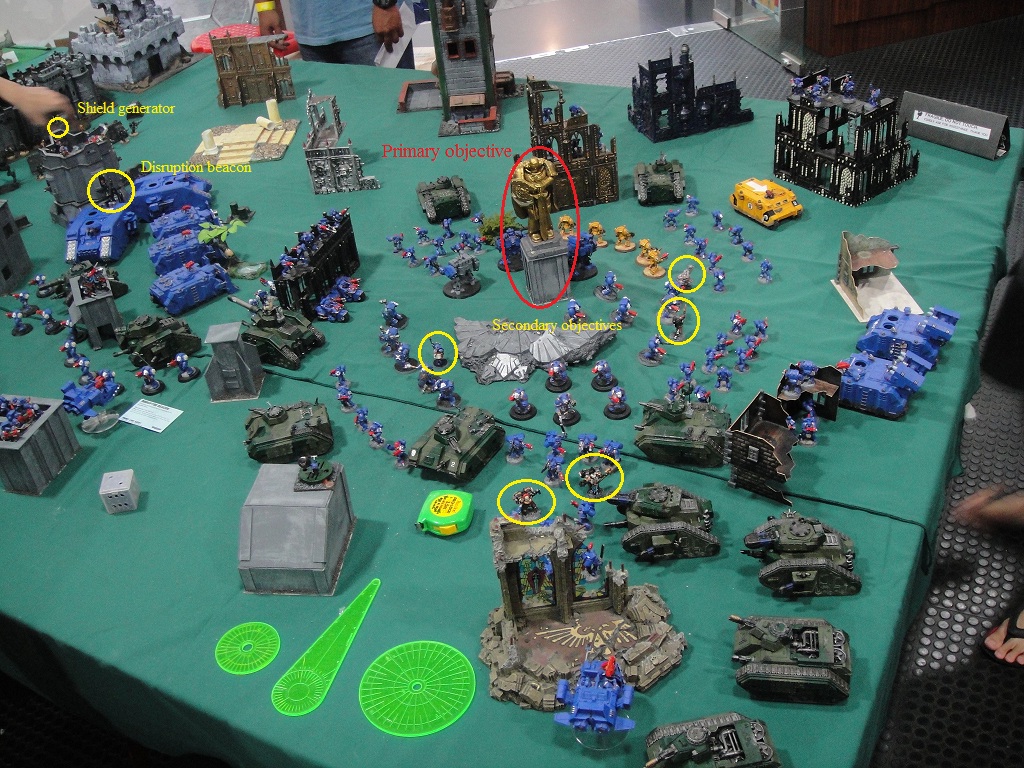
The board


Pretty much anything on the board which isn't an AV14 bastion/bunker or a ruin is an AV12 building. The big golden statue is the primary objective, and here we see the Ultramarines forces in mid-deployment...

The Setup:


Here we can see the Imperial forces have deployed to fend off a frontal assault. Guardsmen in the bastions, huge guns poised to blast apart anything that gets past the bastions, and horrifying amounts of demolisher and plasma cannons placed to cover any open areas within the compound. And just for extra safety, the disruption beacon was placed in the middle of it all, covering the bastions and most of the central compound. Clearly, the Imperials rightly feared the brutal precision of the Blood Angel's deep strike tactics. What they didn't realize, however, was exactly what strategic assets we had chosen...


Uhuh. You read that right. Half the Blood Angels would be coming in from BEHIND the Imperial lines. And the Imperials were so worried about Stormravens dropping from the sky, they'd placed the disruption beacon too far forward. The first turn would be a very nasty surprise indeed...

By the way, for the purpose of the Careful Planning card, we counted one transport and its contents as a single unit. So, a Stormraven, carrying a chaplain, 5 Death Company marines and a Death Company Dreadnought = 1 unit.

Rolling off, the Blood Angels took the first turn.

Turn 1

Summary: Against the Imperials expectations, the Blood Angels turned up from behind, unleashing the might of multiple Stormravens and Land Raiders and their lethal cargoes!

End of Blood Angel's movement phase. This is going to get messy...

Blood Angels:
Luckily for the Imperials, some abyssmally bad luck meant the Angels didn't quite do as much damage as anticipated. All the Stormravens released their payloads of Bloodstrike missiles, knocking down the statue's void shields and shredding a Tactical squad that happened to be between my Assault Terminators and Marneus Calgar. Meanwhile, squads of black-clad Terminators piled out of Landraider Crusaders and Redeemers and tore into the vulnerable rear armour of whatever hapless vehicle happened to be in range. In addition to all this carnage, a pair of krak missile streaked out to strike down the Disruption Beacon in preparation for a drop pod assault in Turn 2.

Imperials:
The Imperial response was swift but lacklustre. Most of the Imperial Guard elements were manning the walls, far from the surprise onslaught. Quite importantly, 3 Vindicators were out of position and swung round to meet the threat, chugging away at top speed so those demolisher cannons don't go to waste. That having been said, the firepower they could bring to bear was still quite formidable, since a lot of the Blood Angel's shooting went into the statue, to minimal effect. As a result, the Imperials had quite a bit of gunishment to wield, damaging several vehicles, notably immobilizing my Stormraven carrying the Sternguard Veterans, which could have quite easily caused quite a lot of damage if I put a volley from their combi-weapons in the right place.

Highlights

None shall stay my wrath!!! I let loose the Death Company Dreadnought from my Stormraven and it didn't disappoint, quickly shredding a nearby 5-man assault squad and killing the attached Chaplain with combat resolution.


3 Chimeras, a Tactical combat squad and 2 multimelta attack bikes all converged on my Death Company Dreadnought, but in an uncharacteristic string of truly remarkable luck, a total of 6 melta weapons (all in melta range, mind you), 3 plasmaguns and 2 multilasers blazed away at the deranged dreadnought, causing 3 penetrating hits, all of which got either a crew shaken or stunned result, which, of course, a Death Company Dreadnought, simply DOES NOT CARE ABOUT. As a side note, one plasmagunner even roasted himself trying to fire his gun, which was probably a mercy, given what happened next...

Kill Calgar! My Assault Terminators comprise 4 Terminators with Lightning Claws and 1 with a Thunder Hammer, accompanied by a Librarian and Sanguinary Priest. Assuming a good psychic check, that means 16 S5 I5 power weapon attacks, with rerolls to hit and wound. That's quite enough to put the hurt on damn near anything it charges, and plain vanilla Terminators without Storm Shields should have been a walk in the park... Alas, it wasn't to be...

I rolled fairly below average with my claws, and he made an absurd number of 5+ invulnerable saves. What started with this...

GRAAAAAARRGGGHHH!!!

... ended with this...

But it wasn't all bad news. During the Imperial turn, the dice gods smiled on me. Chaplain Cassius joined the combat and failed to do anything. I made a few lucky invulnerable saves, and by the end of the Imperial turn, Calgar found himself surrounded by 2 Terminators with Lightning Claws, a Librarian and a Sanguinary Priest. Meanwhile, thanks to horrible failures of combat resolution, Chaplain Cassius went down! How sad is that? The one guy in the vaunted Ultramarines chapter who gets to address Marneus Calgar as 'young Calgar' rushes to his aid, only to achieve buggerall and get himself killed, right in front of Calgar's face!

Anyway, that's it for now. Stay tuned for Turns 2 and 3...

Sunday, December 11, 2011

Batrep: Back to the Angels!

Just got in a good 1750pt scrap yesterday with a new BA list I've been working on - Double Death Star!

HQ
Librarian

Elites
Chaplain
Sanguinary Priest
5 Assault terminators - 4 with Lightning claws, 1 with hammer and shield, in a Land Raider Redeemer with multimelta and extra armour

Troops
5 Assault marines with Sgt power weapon and a meltagun, in a Lasplas Razorback
5 Death Company, 2 with power weapons, 1 with power fist
Death company Dreadnought with Blood talons and magna grapple

Heavy Support
Stormraven with TL assault cannon, Typhoon launchers and extra armour
Predator with autocannon and lascannon sponsons

The Land Raider Redeemer holds the Assault Terminators, Sanguinary Priest and Librarian. The Stormraven delivers the Death Company, chaplain and the DC Dreadnought. The idea is generally to use the Stormraven to deposit a lot of Death Company Anger right in the middle of the enemy to cause as much havoc as possible, then smash whatever's left with the Terminators.

Edwin's Unholy Nidzilla list
HQ
Swarm Lord
Winged hive tyrant with 2 pairs of scything talons and Hive commander


Elites
The Doom of Malantai in a Mycetic Spore
3 Zoanthropes in a Mycentic Spore

Troops
12 Termagants
11 Termagants

Heavy Support
3 Trygon Primes with adrenal glands

Mission: Capture and Control (1 objective in each deployment zone)
Deployment: Spearhead (table quarters)
Tyranids have the first turn.
Terrain is mostly clear with a few buildings and bits of area terrain here and there.

Tyranids reserve everything, I put my whole army on the board to wait for the onslaught...

Turn 1
Tyranids - Nothing. Everyone's in reserve!
Blood Angels - I scoot the bulk of my army forward 12", with one Razorback hanging behind to camp on the objective. The Predator sits behind my LR Redeemer, with it's rear armour firmly placed against the Redeemer's back, in case those Trygons pop up behind me...

Turn 2
Tyranids - Between the winged tyrant and the Swarmlord, everything came in on a 2+, so the WHOLE Nid army came in, Termagants from each flank, Trygons burst from the ground, 2 behind the Blood Angels and one in the middle, the Doom of Malantai, the Zoanthropes and the Winged Tyrant to the front and throughout this stunning assault, the Swarmlord, strode in from the Nid table edge. A horrific deluge of fire from the Trygon Primes' containment spines wrecked one Razorback and exploded another. The Zoanthropes attempted to fire their Warp Lances, but the Librarian managed to use his psychic hood and dispel all three shots.

Blood Angels - The Storm Raven swung back round to deliver the Death Company and the Dreadnought into the Trygons behind me. One assault squad made for a brood of Termagants that strayed too close beside the 2 Trygons, the other backed away together with the LR Redeemer to make use of the 6" Feel No Pain + Furious Charge bubble afforded by the Sanguinary Priest within to attack the middle Trygon in concert with the Terminators and Librarian. The Predator moved to take pot shots at the Doom.

Shooting mostly did nothing but the Stormraven and DC Dread managed to knock a couple of wounds off one of the rear Trygons. Assault was much more satisfying. One Assault squad charged the Termagants to my right, the DC Dread charged one Trygon Prime, the Death Company charged another and the other assault squad charged another together with the Terminators. All the Trygons and the termagants were wiped out a the cost of only 3 Death Company marines! That's 800 points of Nids wiped off the board in 1 assault phase!

Turn 3 to End
The rest of the game, not so interesting. What else happened?
- The Winged Tyrant cast Paroxysm on the Terminators and wiped them out over 3 rounds of combat, then blew up the LR Redeemer, before succumbing to concentrated firepower from the Stormraven and Predator.
- The Doom of Malantai fell to a shot from the DC Dread's magnagrapple (yay, instakill!). The DC Dread then immobilized itself on difficult terrain and spent the rest of the game raging.
- The Zoanthropes fell to abuse from the Redeemer, Stormraven and Predator.

This left me with one measly assault squad to camp on my objective together with an angry immobile Dreadnought nearby, and he had a Swarmlord to babysit the Termagants on his objective. If the game could go on ad infinitum, I suppose I could have picked away at the remnants of his army with my Stormraven and Predator, but the game ended and it was a hard-fought draw, with laurels nudged in the general direction of the Blood Angels for having more points left alive on the table than the Nids.

Afterthoughts
This was my first game against a very experienced and truly vicious Nidzilla player, so I was pretty chuffed with how things turned out, but more than anything else, I was well impressed with the sheer amount of damage my list could dish out with a good, mass charge. 3 Trygon Primes in one assault! That's just insane!

Were there any major mistakes by either player? For me, I don't really think so, though perhaps I could have kept my Razorbacks back-to-back in Turn 1. That would have seriously upped my chances of surviving the initial onslaught of Tyranid Turn 2 and who knows? Maybe I could have gotten in a shot or 2 with my Razorbacks... On his part, I'm not sure what he could have done. Having his first Zoanthrope salvo shut down by the Librarian was plain unlucky. I think his big mistake was not being more aggressive with the Swarmlord. That thing is a monster in close combat and I think he could have tabled me if he just continued to march it straight into my army and pop a can of whupass.

Just before this game I had another one with a significantly less experienced Nid player. Even then, it was quite enlightening to find out the limits of what 5 Assault Terminators could do, exactly. The lesson was this: Just stay the hell away from Tyranid HQ choices. Between Paroxysm, Lash Whips and all the other monstrous nastiness they have, Assault Terminators (as I'm playing them, with 4 claws and 1 hammer) are just better used elsewhere, like shredding Nid tank-beasts, such as Trygons, Carnifexes, Tervigons, and Tyrannofexes. And even then, that's only IF I can charge them with the influence of the Sanguinary Priest.

Would I change anything about this list? Right now, I'm thinking of keeping the 2 Death Stars (Stormraven full of DC, Redeemer full of Terminators) and fiddling about with the rest of the list. But what to do? More staying power? More dakka? Scouts? Dakkapreds? Assault marines? I dunno. For the moment, I'd like a couple more games against some other opponents before I figure out what this army needs. Until then, there's painting to be done!

Saturday, December 3, 2011

Current projects

Okay, it's been a while since I've had the time to post. Here's what's going on with the armies I play:

Blood Angels


The Angels took a backseat to Necron enthusiasm for a while. Now it's the Necrons which are on hold, I'll be looking at 2 more ways to play my Angels. For those who've forgotten, I usually run a mechanized list, with 4 Razorbacks, 2 combiPreds and 2 Baal Preds as the core of the army. Now I'm looking to try out 2 completely different playstyles:

1) Jump army! Yep, a Descent of Angels list. I've already got 2 full Assault Squads, a Librarian with a jump pack, and 2 jumping Priests, so I figured it would be fun to try. I'll be looking to field Sanguinary Guard, too, coz I just love the models!

2) Death Star! 5 Assault Termies (4 claws, 1 hammer) riding in a Redeemer with a Librarian and a Priest. Pass the psychic check for Unleash Rage and that's 16 S5 I5 power weapons attacks, with rerolls to hit and wound. And the squad has Feel No Pain, to boot. Outside of Grey Knights, there's really not much which can stand up to that...

3) Something with Stormravens! I dunno, I still haven't quite figured this one out yet, but I've got 2 nearly painted Stormravens, and by damn, I want to field them in battle in some way...

Necrons


I've been playing quite a few games using my Angels to proxy as Necrons and I have to say: I'm completely hooked!

I've been playing with a list centred around 20 Warriors marching about with an orb-wielding phaeron, flanked by 2 Ghost Arks each loaded with 9 Warriors and a Harbinger of Destruction and it's been awesome. The blob of warriors attracts an insane amount of firepower, but between the orb and the Arks, that blob is insanely tough to kill with shooting. It has, however, fallen to assault, pretty much every game it was assaulted... So far, I've tried out this style of Necron list against IG, Tau and Grey Knights.

Against Tau, the Warrior Blob is nigh unstoppable. Turn after turn, it weathered the abuse from 2 teams of battlesuits, 3 Broadsides and a Hammerhead, leaving the rest of my army free to outflank and chew away at the edges.

The IG opponent I usually play against favours big blobs of infantry. I've played twice against him. The first time round I lost and only later realized that due to a horrible miscalculation, I was fighting with a ~250 pt handicap. The 2nd time round, the dice simply weren't with me. In that game, I managed to fail 5 out of 6 armour saves with my Immortals (5 ones!), and a vital assault with my Scarabs into one of his Leman Russes fell flat on its face, when I only rolled 5 hits out of 20 attacks hitting on a 4+. Not to mention the absurd number of below average volleys of gauss fire...

Against the Grey Knights (Draigowing), I played using 2 huge Warrior blobs. A bit unwieldly, but in this game, the Doomsday Ark really shone, helping me to wipe out a squad of the dreaded Paladins.


In all the abovementioned games, I fielded a Doomsday Ark and 2 Annihilation Barges. I found that the barges certainly get the job done for the points invested in them, but I've mixed feelings about the Doomsday Ark. Its tremendous range, firepower and physical presence on the battlefield make it a VERY enticing target for the enemy. In every battle, my opponent detached a small force specifically to destroy the Ark. That in itself is a pretty useful trait of the Ark, but at that amount of points, I really wonder if I'm not better off with a team of 3 Canoptek Spyders pooping out Scarabs, with 25 pts left over for miscellaneous gadgets for the Lords and/or Crypteks...

I think the list still needs a bit of tweaking before I make any major investment. In any case, I'll be coming back to them after I sort out my Angels, perhaps in early 2012...


Chaos Marines


Gathering dust. I like that army and all, but every game I've played has been a fight against getting wiped out. It's ok, I'll busy myself with the other armies until the rumoured Chaos Legions codex turns up sometime in 2012.

Grey Knights
Gathering dust. I'll be back for them someday...

And that's it from me. Next update in... the hell I know. It'll happen when it happens...